Friday 25 March 2016

Makeup: Dirty hands


Dirty Hands...

Health and safety
  • Make sure your model is covered up with a gown to protect their clothes from product spillage, just in case, as this is a messy job.
  • Keep hair away from the face when applying products/ makeup
  • Decant products between each model
  • Keep work surface clear and surrounding area 

We looked into our characters with our gothic horror and played around with making the hands look dirty during class. I used supra color, bruise wheel and blood to create a vision of my character Mr. Hyde committing crimes in the street with the dirt of the street and the blood of his victims.

I made sure my model was covered up with a gown to protect her clothes from any excess product that may get on her; I then applied the supra color with makeup brushes and used my hands to cotton buds to really work in the product to give it a realistic look. I feel I could of used more product and worked in the black near the fingers more, now looking back at my images of the task.

after applying the colour I used dripping blood by Kryolan and coated the hands with this all over with unevenness to give it a scrappy look, how it would look realistically.
I enjoyed applying product and building it up and seeing the results of this. I feel next time I would use more blood and darker shades and also to work in the product.

Products & materials used:
  • Supra color palette Kryolan
  • Bruise wheel by mehron
  • Running blood by Kryolan
  • Cotton buds
  • Makeup brushes for detail
  • Cleanser to remove product 


Hands becoming dirty from makeup and blood build up.


more of the blood on the hands, as if he had just committed a crime.


Working the dirt into the nail bed and all over the hands with the dried blood (post murder)


Makeup: Dirty Teeth


DIRTY TEETH...

This week we worked on making the teeth look dirty and discoloured, it was something completely new and thoroughly enjoyed the task and learning the steps to achieve this; First of all we looked at the health and safety steps before carrying it out..

Health and safety
  • Make sure your model is covered up with a gown to protect their clothes from product spillage, just in case, as this is a messy job.
  • Make sure the skin well prepped (cleanse, tone and moisturise)
  • Make sure latex, spirit gum is patch tested on model before use 48 hrs before
  • Keep hair away from the face when applying products/ makeup
  • Decant products between each model
  • Keep work surface clear and surrounding area 

I first of all dried the teeth which I worked on with a cotton bud to absorb any excess moisture for the product to really become effective and look dirty, this will ensure the product to stay.
Making sure your model stays still and keeps their mouth open, which can be very uncomfortable, ensure you work quickly but effectively.

I then placed a small amount of teeth enamel onto my palette and applied it with a small makeup brush, the right size for the area I'm about to work on, which was the front two teeth; I played around with the light shade of brown and then the black on top to give it different textures and colour.
My model and I found this funny to do, by making her look like she has rotten teeth, it was the first time I had ever done this before and I enjoyed it.


I think next time I would do more random teeth and play around more with getting the product more precise on the teeth, we found it hard not getting moisture on the teeth due to it being hard staying in a fixed position.

After we did this task, to remove the enamel off the teeth we used a small amount of surgical spirit with a cotton bud to gently remove the product, this obviously very chemically, so it's important to use a small amount for health and safety reasons and to inform your model before doing so.

Products and materials used:
  • Cotton buds
  • small makeup brushes to apply enamel
  • Palette to decant product onto
  • Teeth enamel by Kryolan light brown and dark
  • Surgical spirit 
Here are some images of the teeth enamel & the products used

Model: Danielle Jesshope 
Makeup Artist: Natalie Allana Hodgkins


Monday 21 March 2016

Makeup: Wound pieces- Colouring & applying

Wound pieces, how to colour & apply...

In today's lesson we used prosethic wounds. It was an introduction to next year when we do special effects, so I was very excited to give it a go and see how it was done.
We first watched sue demonstrate, then we got stuck in with playing with the new products and colouring and filling the wound.

Health and safety
  • Make sure your model is covered up with a gown to protect their clothes from product spillage, just in case, as this is a messy job.
  • Make sure the skin well prepped (cleanse, tone and moisturise)
  • Make sure latex, spirit gum is patch tested on model before use 48 hrs before
  • Keep hair away from the face when applying products/ makeup
  • Decant products between each model
  • Keep work surface clear and surrounding area 
  • Make sure the area you are working on it prepped and that you use barrier foam before applying the mould, making the wound remove pain free without sticking to much to the skin itself.


What I did and how...

I used a ready made prosthetic piece in a  wound mould, applied the prosaide which acts like a glue on the back of it and on the area of the skin where I wanted to place it, which was the forearm.

I made the sure the glue went clear before placing the prosthetic onto the skin and pressed down hard which fixing the wound and disolved the edges with witch hazel on a cotton bud in order for it to blend into the skin, making it look more realistic.

I found it tricky to blend the edges, so next time I would apply more prosaide/ glue and more care with witch hazel. I rushed a little bit cause we were running out of time, but I feel I did a good job with the overall look in the time given, especially where it was my first time doing this.
After I blended the edges, I got creative and mixed up a matching foundation colour over the wound for it to really blend into my models arm well; I then built light shades of red and pink Kryolan  supra colour. 

I believe the trick of creating a good piece of prosthetic is to slowly build on it with a mixture of colours, I then used dark shades from the bruise wheel and then coated it with Kryolan congeilled and runny blood with a sponge to create more of a spalted effect on the skin.

Between building the product I powdered the area in order for the application to fix in place. 
Here are the images of the stages of my lesson of applying wounds and creating into a more "Gorey" effect, which I really enjoyed doing.

Products & Materials used:
  • Barrier foam
  • Prosaide (glue for sfx)
  • Wound pieces from gelatine
  • Pro clean to remove the wound pieces off with
  • Witch hazel to smoothen edges to blend into skin
  • Runny blood Kryolan 
  • Supra color Kryolan 
  • Cotton buds
  • Eyeshadow brushes and small brushes for detail 
  • Stiple sponge 
Images of the products used during this task shown below


Wound pieces applied to the skin 


Pro-clean to remove the pieces when complete


The stages of the process of the wound piece in action 


The final result working and building up product to make it look realistic, not too bad for my first attempt, I enjoyed this week as much as all my weeks doing special effects.


More images just at different angles


Saturday 19 March 2016

Claudia face & hair chart Designs

I gathered some ideas from my mood board which is on my blog for my character design of Claudia, I wanted to create another freak to add to my chosen to series American horror story the freak show season 4. 

I wanted to capture the story of her being rescued by Mrs. Laderman her next door neighbour from a fire and being reconstructed into a main freak of her show. I wanted her to be transformed into a 'perfect' doll/puppet showing her being controlled by Mrs. Laderman, so this is where I got the idea of her being a real life puppet/doll. I wanted to show her misunderstood and vulnerability by her being mute and Mrs. Laderman being her leader as a ventriloquist.

I want Claudia to be misunderstood and people to not go near her, I want them to be intrigued by her presence and thinking she's evil due to Mrs. Laderman telling the others she's had a secret past.

She's only allowed out at the last act due to her being a isolated young lady and not having any interaction other then Mrs. Laderman and she also wants to keep it that way due to her controlling ways. 

Claudia Face Chart Design 1.


Face Chart Design 2.


Face Chart Design 3.

This is my first face chart design of my character Claudia, I wanted to test and try out a puppet/ doll design and i gathered inspiration from images of wooden dolls, therefore I wanted to create a wooden texture of the skin with different tones of browns with lined and circular effects, to create a fake right realistic feel of the doll.

I researched into 1950's/60's dolls and I loved the high arch look, making Claudia look from that era because my chosen show is from that time. I want to create large eyes with the illusion of white and dark tones around the eyes to make them pop and appear open and intense, it gives a creepy, strange feel which I want to create. I also wanted to use a timeless red lip colour to finish off the look. 
Lastly, I wanted to create subtle scratch marks/ cuts on the neck to show her being destressed, I will use scratch palette by Kryolan to create this with supra color.

Products used listed on Face Chart:


Face Chart Design  4. 


Claudia Hair chart design 1.


Hair Chart Design 2.


Hair Chart Design 3. 


Thursday 17 March 2016

Makeup: Sweat tears & Fever


Sweat, fever and tears 

This week we looked at creating fever, sweat and tears. Fever is created when someone has a disease or subtle illness, for example caused by flu which can give you a high temperature making people feel hot, sweaty and showing that red/flushed look over the cheeks especially and forehead. 

I used the supra color palette with a stiple sponge to create that effect on the cheeks and forehead. It looked really effective and I like how simple yet effective it looks, I mixed the red & pink colours together and built the product up to create the effect.

HEALTH & SAFETY
  • Make sure your client is covered up
  • Make sure the skin well prepped (cleanse, tone and moisturise)
  • Make sure latex, spirit gum is patch tested on model before use 48 hrs before
  • Keep hair away from the face when applying products/ makeup
  • Decant products between each model
  • Keep work surface clear and surrounding area 

It is important to be careful near the eye area, do not go to close, you want to make it look realistic but can cause serious irritation if comes in contact.

Products & Materials used for Fever and sweat:
  • Supra color palette red & pink
  • Stiple sponge
  • Glycerine applied with a cotton bud- sweat effect 
Model: Nicole Coalville 
Makeup Artist: Natalie Allana Hodgkins


Images of building up the supra color with the stiple sponge stages to create slight fever of the skin, simple yet very effective on camera.


After creating the fever I added sweat to give it more of an impact to show the illness because with fever comes sweat usually and by using a cotton bud I applied the Glycerine working from the hair line and dabbing it on the skin creating the 'dripping sweat' effect; I like with the Glycerine how it sticks but slowly drips down the skin.

I built this up as you will see in the photographs below. I thoroughly enjoyed the simplicity of this task and how effective it looks with applying it correctly to created the sick sweaty fever illness.


I built the Glycerine into the hair line and pulled the hair onto the face to make it look more realistic where the hair is stuck to the face due to 'sweat'. I made sure it dripped down the sides of the face where you usually find you sweat the most and down the temples. I had fun doing this task and I was happy with the outcome and guidance from sue.


More images of the side of the head with the use of Supra color and Glycerine
'Fever & Sweat' creation 


We also created tears as past of our tasks this week in class.


Gothic meets Fashion


This week we looked and had to choose a fashion picture out of a few of them that were displayed for us on the sides, I chose the Vivienne Westwood design to recreate in my own way on my model.

We took turns to play around with different products we had, what brushes would work best to get the effect we were after. 

I really enjoyed this task, I loved the texture of this makeup look which was seen in the Vivienne Westwood runway show in spring of 2014 I believe.

It really made me become free with the brush strokes and made me create a beautiful disaster and I was pleased with the way it came out on my model, he also said he'd love to wear it if his band ever tours which I found funny and pretty cool at the same time.

It reminded me of a mixture of tribal meets gothic meets fierce 'kiss' the band influenced look.

I love how simple yet effective it looks and it works so well with the hair design.

Here is the image I used to inspire my look on my model, I used supra colour by Kryolan black and white and I used a couple brushes to give the stroke texture I wanted including my foundation brush small paint brush and small eye shadow brush.


Here are the images below of my take on the picture above, it made me create and I thoroughly enjoyed creating this in my own way. I was definitely in my element when carrying out this my task, I was gutted we didn't have time that I could do another look.

Photos of the stages of the makeup process of gothic meets high fashion runway, plus I am a huge fan of anything Vivienne Westwood, what a huge inspiration.


I collaborated the image of Vivienne Westwood runway fashion makeup with my makeup design I created next to it, I feel it works and looks amazing next to each other. 

Wednesday 16 March 2016

Makeup: Bruised eye


That's got to hurt: 'Bruised Eye'

What I did...
This week the task was to create a bruised eye, we looked at different images in class and created my version. I created this using the supra color and the bruise wheel by Mehron to achieve this. When creating this is started to look a bit theatrical but when I started to build up the products and blend it started to look like a huge bruised eye, I thought about how it was created and It looks like a severe punch to the eye created by a fight scene.

Health and safety
  • Make sure your model is covered up with a gown to protect their clothes from product spillage, just in case, as this is a messy job.
  • Prep the skin (cleanse, tone and moisturise)
  • Be careful around the eyes when applying products/makeup
  • Use barrier foam when applying SFX onto the skin e.g. blood, latex, gelatine
  • Keep hair away from the face when applying products/ makeup
  • Decant products between each model
  • Keep work surface clear and surrounding area 

When looking at my images there are a few things I would of done again, I would of used more deep purple tones and yellows in it. 

However, I was happy with my first attempt at creating the bruised eye, I feel I could of used more colouring in with yellow tones and purples tones to create a more realistic look. When blending it, it started to look better a more realistic but for future bruised eyes i would of done this.

  Products & Materials used:
  • Supra Color red, pink & purple
  • Bruise wheel by Mehron
  • Kabuki brush and small eye shadows brushes to create detail


Images up close of the red and deep red tones of the bruised eye created by blending the bruise wheel product and supra color product to create this look. 


Tuesday 15 March 2016

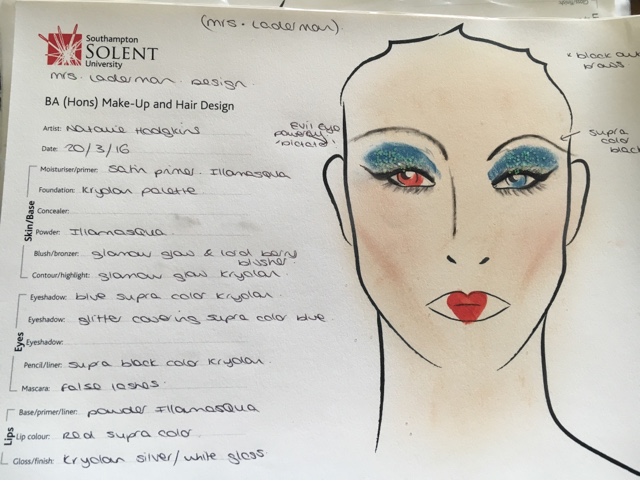
Mrs. Laderman face chart designs (updated)


Mrs. Laderman Face Chart Designs and Hair Charts

Mrs. Laderman Face chart design 1.


This was first design on my face chart, I wanted bright pink and purple tones. Powerful dark eyes with white lenses to really enhance the purple and black. 

I wanted to achieve a evil yet charming vision of Mrs laderman with the fake show leader woman in the makeup. However, I didn't like how it came out and I feel it would better carrying this out on a model to really see how it would look.
When looking back at my design, I found it not exactly what I was after, that I could come up with something more colourful and powerful and creative.

Products listed on face chart sheet. 

Mrs. Laderman Face chart Design 2.


This is my second design for my character design for Mrs. Laderman, I wanted to keep with the 1950/60's eye makeup because of the era my chosen to show was set in (American horror story season 4). With the flick eye liner bright cream eye shadow, with the white devious eyes with contacts I would use.

I would keep the skin basic with pink flushed cheeks, simple yet charming and sweet, with the sweet heart pink lips with dabbed on glitter to keep it in line with the circus theme, elaborate power statement with this.
I wanted to also draw on the bottom lashes as this was a popular makeup statement during the early 60's and this would make the lashes appear longer and fuller with more of an impact on stage at the carnival. 
I wanted the whole look to be classic with bright colours yet sneaky with her true "colours" shining through her eyes with the use of the white contact lenses.

Products listed on face chart sheet 

3. Final face chart Design- Mrs. Laderman 


Mrs. Laderman Hair charts 

Hair Chart Design 1.

I wanted to create a typical 1950's/60's hair style because American Horror Story is set in this era, I tried a few designs to see what would look best. I wanted to sketch out a couple styles pinned up with creating curls with the heated curlers or with curlers as this look very popular during this period and also very effective giving the hair a lot of texture. However, doing this I find very fiddly and I wanted to achieve something texturised but with a lot of volume combined.
Here are my hair chart designs:


Images below of the hair waved created with the heated wave tongs, it gives the hair great texture, but a makes the hair a little flat to look at and I wanted to create a crazy style with frizz, so I thought this wasn't the best idea for my character.


Below image with the use of heated curling tongs to create tight curls pinned to the head, very classic and beautiful. However, very time consuming and fiddley, not the volume I'm after, I want it more dramatic, with a lot of lift and mess to reflect her insanity and control. 


Mrs. Laderman Final hair design 


I decided to use this hair chart for my final character design, it's simple yet effective with the volume and frizz I wanted to create, to reflect her insanity, yet it will look glamorous and vibrant with a lot of texture with back comb and patterns of the crimper.